27 Show-Stopping Desserts That Secretly Take 30 Minutes or Less
Bakery-worthy sweets that look like they took all afternoon — the kind that make guests gasp and ask for the recipe. Spoiler: most use five ingredients, zero baking skill, and pantry staples you already own.


There is a particular kind of magic that happens when someone bites into a dessert you “obviously slaved over for hours” — and you know, in your heart, that you pulled it together during the commercial break of your favorite show. This collection is built on that exact magic. Every recipe here is engineered to look dramatic and taste incredible while hiding just how little effort actually went in.
You’re about to meet 27 desserts that trade technique for trickery in the best possible way. Some lean on store-bought shortcuts (without ever tasting like it). Some rely on presentation flourishes that transform humble ingredients into something photo-worthy. And a few are so embarrassingly simple that you’ll wonder why you ever struggled through fussy multi-day recipes in the first place.
Before we dive in, a small confession: the fastest recipes here clock in around ten minutes of active work. The longest pushes thirty. Not one requires you to temper chocolate, fold meringue without weeping, or whisper encouragements to a rising dough. Whether you’re hosting last-minute guests, volunteering for a potluck you forgot about, or simply craving something spectacular on a Tuesday, there is something on this list that will save you.
01. The Secret to Effortless Elegance
Why some quick desserts wow and others flop — the framework every home baker should know before reaching for a whisk.
The difference between a dessert that looks thrown together and one that looks bakery-curated almost never comes down to time. It comes down to three things, and once you internalize them, every recipe in this collection becomes a canvas rather than a set of rules to follow anxiously.
The first is contrast — visual, textural, or both. A smooth panna cotta looks ordinary on a plate by itself, but drizzled with a dark, glossy berry reduction and flecked with crushed pistachios, it suddenly belongs in a cookbook. The ingredients cost pennies. The payoff looks like art. Learn to pair silky with crunchy, glossy with matte, pale with jewel-toned, and your desserts will look expensive without ever being expensive.
The second is height. A scoop of something in a bowl reads as casual. The same scoop piped into a coupe glass, layered with a second element, and crowned with one theatrical garnish reads as intentional. Glassware is your single greatest cheat code. If you own tall wine glasses, cordials, or even mason jars, you own the infrastructure for a dessert that appears to have had a stylist involved.
The third is restraint in garnish. Amateurs overload. Professionals edit. A single mint leaf placed deliberately looks curated. Three sprigs of mint scattered randomly looks like a salad. One perfect raspberry on a slice of cake looks like a Parisian patisserie. Eight raspberries rolling around the plate looks like you panicked. Pick one or two finishing touches and resist the urge to add more — this alone will elevate 90% of what you bake.
Keep these three principles in the back of your mind as you scroll. You’ll notice them doing quiet work in every recipe that follows. And once you start applying them to your own cooking, you’ll never look at a simple bowl of pudding the same way again.
One piece of equipment changes everything
If you own or can borrow a small offset spatula (the kind decorators use), nearly every recipe here becomes noticeably prettier. It’s a $6 tool that makes swoops of frosting, ganache, and whipped cream look professional rather than applied-with-a-butterknife.
02. No-Bake Wonders
Zero oven, zero stress, maximum impact. These four recipes are the fastest path to a dessert that looks like it came from a bakery window.
No-bake desserts are genuinely underrated. When done thoughtfully, they skip the most time-consuming, temperature-anxious parts of baking while delivering textures — mousse, ganache, cream, parfait — that you genuinely cannot achieve with flour and an oven. The trick is to treat “no-bake” as a creative choice, not a compromise.
Three-Ingredient Chocolate Mousse
15 min + chillA classic French technique stripped down to its essence. The result is impossibly silky, richly chocolatey, and served in little ramekins or wine glasses. It looks so indulgent that nobody will believe you made it with three things.
You’ll Need
- 7 oz good-quality dark chocolate
- 2 cups heavy cream (divided)
- 3 tbsp powdered sugar
The Method
- Melt chocolate with ½ cup cream gently, stir smooth, cool 5 min.
- Whip remaining cream with sugar to soft peaks.
- Fold whipped cream into chocolate in three additions.
- Spoon into glasses, chill 2+ hours, garnish with shaved chocolate.
Strawberry Tiramisu in Glasses
20 min + chillAll the drama of traditional tiramisu — the layers, the creaminess, the spoon-diving-through-strata moment — reimagined with fresh strawberries instead of coffee. Served in individual glasses so each serving looks like its own tiny architectural masterpiece.
You’ll Need
- 1 lb strawberries, macerated with 2 tbsp sugar
- 16 oz mascarpone
- 1 cup heavy cream, whipped
- ½ cup powdered sugar
- 1 pack ladyfingers
- Lemon juice, vanilla
The Method
- Crush macerated berries, reserve juice.
- Whip mascarpone with sugar and vanilla, fold in cream.
- Dip ladyfingers in strawberry juice.
- Layer cookie, cream, berries — repeat — in each glass.
- Chill 4 hours. Top with a whole berry before serving.
Cookies & Cream Icebox Cake
12 min + chillA loaf-pan dessert that somehow slices into dramatic stripes and tastes exactly like childhood. The cookies soften overnight into a cake-like crumb, and when you slice it, nobody can believe it wasn’t baked.
You’ll Need
- 3 cups heavy cream
- ⅓ cup powdered sugar
- 1 tsp vanilla
- 2 packs chocolate sandwich cookies
The Method
- Whip cream, sugar, vanilla to medium peaks.
- Line loaf pan with plastic wrap, overhanging sides.
- Alternate layers of cookies and cream (4-5 layers).
- Cover, refrigerate overnight.
- Invert onto a plate, dust with cookie crumbs, slice.
Salted Caramel Pots de Crème
15 min + chillA French bistro classic, usually made with careful water baths and thermometers. This version skips all of that and still tastes like something you’d pay $14 for at a nice restaurant. Shockingly silky. Deceptively simple.
You’ll Need
- 1 cup heavy cream
- ½ cup whole milk
- ½ cup store-bought caramel sauce
- 2 tsp unflavored gelatin bloomed in water
- Flaky sea salt to finish
The Method
- Warm cream, milk, and caramel until just steaming.
- Whisk in bloomed gelatin until fully dissolved.
- Pour through a sieve into ramekins.
- Chill 4 hours or overnight.
- Finish with sea salt and a drizzle of caramel.
Reader Favorite
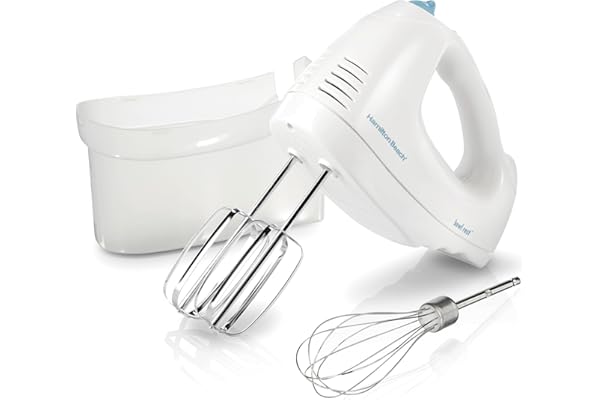
The Hand Mixer That Makes Whipped Cream in 90 Seconds
A quiet, lightweight 5-speed mixer that’s powerful enough for thick doughs but gentle enough for perfect soft peaks. If you’re making more than two no-bake desserts a year, this pays for itself.
Check Price on Amazon →03. 5-Ingredient Showstoppers
Short ingredient lists, long on drama. When the recipe card has five lines, nobody suspects you of culinary wizardry — but the finished dish quietly begs to differ.
There’s a misconception that great desserts require long ingredient lists. In reality, most iconic sweets — meringues, pavlovas, panna cotta, truffles, ganache tarts — rely on a handful of components done well. The constraint actually forces quality: when only five things are in the dessert, each one has to pull its weight. That’s why these recipes taste better than their complexity suggests.
Whipped Lemon Ricotta Cups
10 minutesBright, fluffy, and somehow deeply sophisticated. Ricotta gets whipped into a cloud with lemon and honey, then crowned with a crumble and fresh berries. This is what a Michelin amuse-bouche would look like if it appeared in your kitchen.
You’ll Need
- 2 cups whole-milk ricotta
- ⅓ cup honey
- Zest of 2 lemons
- ½ cup crushed amaretti or graham
- Fresh raspberries
The Method
- Whip ricotta with honey and zest for 3 full minutes until airy.
- Spoon into small glasses.
- Top with crumbs and berries.
- Finish with a second drizzle of honey and lemon zest.
Nutella-Stuffed Dates with Sea Salt
8 minutesThese look like tiny jewels on a plate — glossy, dark, and irresistible. Medjool dates are split, stuffed with chocolate hazelnut spread, dipped in dark chocolate, and finished with sea salt. One bite, and everyone becomes very quiet in the best way.
You’ll Need
- 16 Medjool dates, pitted
- ½ cup chocolate-hazelnut spread
- 6 oz dark chocolate, melted
- Flaky sea salt
- Chopped pistachios (optional)
The Method
- Slit each date lengthwise.
- Pipe or spoon in chocolate-hazelnut spread.
- Dip half of each date in melted chocolate.
- Place on parchment; sprinkle salt and pistachios.
- Chill 20 minutes to set.
Balsamic Roasted Strawberries Over Vanilla Ice Cream
15 minutesA dessert that transforms two supermarket ingredients into something you’d expect on a tasting menu. The balsamic reduces into an intensely glossy, almost wine-like sauce. The berries sweeten, soften, and become impossibly concentrated. Poured over cold, creamy ice cream, the temperature contrast alone is worth the five minutes of effort.
You’ll Need
- 1 lb strawberries, halved
- ¼ cup balsamic vinegar
- 3 tbsp brown sugar
- Good vanilla bean ice cream
- Cracked black pepper (yes, really)
The Method
- Toss berries with sugar and balsamic.
- Roast at 400°F for 12 minutes until jammy.
- Cool for 5 minutes — they thicken as they sit.
- Spoon warm over ice cream scoops.
- Finish with a tiny grind of pepper.
04. Chocolate Desserts That Look Like Art
When you want to impress, chocolate is your ally. It photographs beautifully, tastes universally loved, and hides a surprising amount of technique behind a glossy surface.
Chocolate has a reputation for being temperamental, but the recipes in this section sidestep every difficult thing about it. No tempering, no thermometers, no tempering curves. What you get instead are desserts where chocolate is the star — glossy ganache, deep fudge, dark shards — without any of the anxiety that usually accompanies working with it.
Flourless Chocolate Torte (One Bowl)
30 minutesA dense, fudgy, crack-topped chocolate cake that somehow has no flour and requires exactly one mixing bowl. It slices into wickedly dark wedges that look like they came from a fine-dining dessert cart. Naturally gluten-free, unnaturally good.
You’ll Need
- 8 oz bittersweet chocolate
- ½ cup butter
- ¾ cup sugar
- 3 large eggs
- ½ cup cocoa powder
- Pinch salt, splash vanilla
The Method
- Melt chocolate and butter together.
- Whisk in sugar, then eggs one at a time.
- Fold in cocoa and salt.
- Pour into a parchment-lined 8-inch pan.
- Bake 22-25 minutes at 350°F. Dust with powdered sugar.
Dark Chocolate Bark with Sea Salt & Pistachios
10 min + setCover a sheet pan with glossy melted chocolate, scatter it with jewel-toned toppings, and you’ve made something that looks like it came from a candy boutique. Wrap it in parchment and you’ve also made the easiest host gift on earth.
You’ll Need
- 12 oz good dark chocolate
- ½ cup shelled pistachios
- ¼ cup dried cranberries
- Flaky sea salt
- Edible gold flakes (optional drama)
The Method
- Melt chocolate slowly (microwave in 30-sec bursts).
- Pour onto parchment-lined sheet, spread thin.
- Scatter pistachios, cranberries, salt immediately.
- Let set at room temp 2 hours or chill 30 min.
- Break into irregular shards — imperfection is the look.
Chocolate Truffles Rolled in Cocoa
20 min + chillTruffles sound like they require patisserie school. They require eight minutes of active work. The ganache ball rolled in cocoa powder is one of the most iconic, most impressive-looking desserts in existence, and it’s embarrassingly easy to make.
You’ll Need
- 8 oz dark chocolate, chopped
- ½ cup heavy cream
- 1 tbsp butter
- Pinch salt
- Cocoa powder for rolling
The Method
- Heat cream to almost-boiling, pour over chocolate.
- Let sit 3 minutes, then stir until smooth.
- Stir in butter and salt. Chill until firm (2 hours).
- Scoop teaspoons, roll into balls.
- Toss in cocoa powder. Keep cold until serving.
Why Chocolate Desserts Always Win
- Universally loved across age groups
- Photographs beautifully on any plate
- Pantry-friendly ingredients
- Naturally long shelf life
- Rich flavor hides simple technique
Pitfalls to Avoid
- Overheating chocolate (it seizes)
- Using chocolate chips for ganache (stabilizers dull the shine)
- Skimping on quality — it shows
- Working in a humid kitchen without chilling
- Touching truffles too much (they melt)
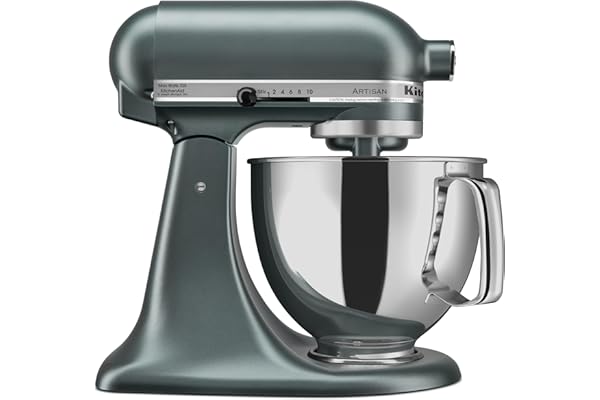
For the Serious Home Baker
The Stand Mixer Every Dessert Kitchen Eventually Buys
From silky buttercreams to egg-white meringues to the dough for every cookie on the internet, this mixer handles it while you walk away. For comparisons and top picks, see our in-depth stand mixer reviews.
View on Amazon →05. Fruit-Forward Beauties
Nothing looks more naturally luxurious than fruit at its peak. These desserts let the produce do the styling and turn a summer afternoon into a celebration.
When fruit is in season, the easiest desserts become the most impressive ones — because the ingredients arrive pre-styled by nature. Peaches look like paintings. Berries look like jewels. Figs split open like little art pieces. The job of the cook is simply to frame them correctly. Everything in this section leans on that principle.
Grilled Peaches with Honey Mascarpone
15 minutesGrill marks across a ripe peach are genuinely beautiful. Add a smear of honey-sweetened mascarpone, some crushed amaretti cookies, and a drizzle of good olive oil, and you have a dessert that looks like it cost $18 and took twelve minutes.
You’ll Need
- 4 ripe peaches, halved & pitted
- 1 cup mascarpone
- 3 tbsp honey + more for drizzling
- ⅓ cup crushed amaretti cookies
- Good olive oil & flaky salt
The Method
- Heat grill or grill pan to medium-high.
- Brush peaches with oil; grill cut-side down 3-4 min.
- Whip mascarpone with honey until spoonable.
- Place peaches cut-side up, fill hollow with cream.
- Top with amaretti crumbs, salt, and honey drizzle.
Mixed Berry Pavlova (Store-Bought Meringues)
12 minutesAuthentic pavlova is a lesson in patience. This version is a cheerful shortcut: you assemble pre-made meringue nests, pile them with whipped cream, and crown them with berries. The finished plate looks like it escaped from a magazine shoot.
You’ll Need
- 6 store-bought meringue nests
- 1½ cups whipped cream
- 2 cups mixed berries
- 2 tbsp good jam, warmed
- Fresh mint
The Method
- Arrange meringues on a platter.
- Spoon or pipe whipped cream into each.
- Pile with berries in varying sizes.
- Drizzle warmed jam over the top.
- Finish with torn mint leaves.
Poached Pears in Red Wine
25 minutesWhole pears simmered in red wine take on a deep ruby color that genuinely looks like stained glass. Sliced and plated with a pool of the reduced syrup and a scoop of vanilla ice cream, this is the kind of dessert that makes people assume you have a culinary degree.
You’ll Need
- 4 firm pears, peeled (stems on)
- 2 cups red wine
- ¾ cup sugar
- Cinnamon stick, 2 star anise, 1 vanilla bean split
- Strip of orange peel
The Method
- Combine everything except pears; bring to simmer.
- Add pears, cover, gently poach 15-20 minutes.
- Remove pears. Reduce liquid to a syrup (10 min).
- Serve pears whole or sliced, drizzled with syrup.
- Add a scoop of ice cream on the side.
06. Frozen Treats That Wow
Cold, luscious, and almost entirely hands-off. The freezer is the busy baker’s best ally — especially in summer, when turning on the oven feels like a betrayal.
Frozen desserts have an underrated superpower: they look and taste like they required an ice cream machine, careful tempering, or advanced patisserie skill, when in reality most of them are just “mix things, freeze, slice.” The freezer does all the hard work. You get the credit.
Semifreddo with Pistachio & Berry Swirl
20 min + freezeThink of semifreddo as ice cream’s elegant, no-machine-required cousin. It slices into dramatic stripes, tastes like something from a Roman gelateria, and freezes beautifully for up to two weeks. The ultimate make-ahead wow.
You’ll Need
- 4 eggs, separated
- ¾ cup sugar
- 2 cups heavy cream, whipped
- ⅓ cup pistachio butter
- ⅓ cup raspberry jam
The Method
- Whisk yolks with half the sugar over simmering water 3 min.
- Whip whites with remaining sugar to stiff peaks.
- Fold whites, then whipped cream, into yolk mixture.
- Layer into loaf pan; swirl in pistachio butter & jam.
- Freeze overnight. Slice cold; let sit 3 minutes before serving.
Frozen Yogurt Bark with Fruit & Granola
10 min + freezeA sheet pan, some good yogurt, and whatever pretty toppings are in your pantry. Freeze, break into shards, and serve. This has become a wildly popular dessert online because it’s gorgeous, healthy-adjacent, and takes roughly the amount of effort as buttering toast.
You’ll Need
- 3 cups Greek yogurt
- 3 tbsp honey or maple syrup
- 1 tsp vanilla
- Berries, granola, chopped nuts, shredded coconut
- Optional: melted dark chocolate for drizzle
The Method
- Stir yogurt, honey, vanilla together.
- Spread ½ inch thick on parchment-lined sheet.
- Scatter toppings across the surface.
- Freeze 3-4 hours until solid.
- Break into irregular pieces. Eat quickly or store frozen.
Affogato (With a Twist)
2 minutesThe most theatrical two-ingredient dessert in existence. A scoop of ice cream. A shot of hot espresso poured over it tableside. The gasps are immediate. Upgrade with a shard of chocolate bark, a splash of liqueur, or a biscotti cookie on the saucer.
You’ll Need
- Good vanilla gelato or ice cream
- Freshly pulled espresso shots
- Optional: amaretto, Frangelico, or Kahlúa
- Optional: cocoa powder dusting
- Biscotti for the side
The Method
- Chill coupe glasses or small bowls.
- Place one generous scoop in each.
- Pull espresso shots the moment guests sit down.
- Pour over ice cream tableside for drama.
- Optional: add liqueur after the espresso.
07. Cheesecakes Without the Fuss
Cheesecakes have a reputation for being fickle divas — cracking at the top, weeping at the edges, requiring water baths. These versions refuse to play that game.
There is a whole family of cheesecakes that simply do not require a water bath, a springform pan ritual, or hours of cooling protocol. The ones in this section deliver the tangy, creamy, decadent cheesecake experience with considerably less drama. Most are no-bake. All are embarrassingly simple. And all look like they came from a glass display case.
No-Bake Lemon Cheesecake Jars
15 min + chillIndividual jars of creamy, bright, citrus-forward cheesecake that set up in the fridge without any baking. They look like something a boutique patisserie would sell for $9 apiece. You’re making six of them for about three dollars total.
You’ll Need
- 1½ cups graham crumbs + 5 tbsp butter
- 16 oz cream cheese, softened
- ¾ cup powdered sugar
- 1 cup heavy cream, whipped
- ¼ cup lemon juice + 2 tbsp zest
- Lemon curd (for topping)
The Method
- Mix crumbs with butter, press into jar bottoms.
- Beat cream cheese with sugar until fluffy.
- Stir in juice and zest, then fold in whipped cream.
- Pipe or spoon into jars over crust.
- Top with lemon curd. Chill 4+ hours.
Cookie Crust Mini Cheesecakes (Muffin Tin)
35 minutesA whole cookie serves as the crust for each miniature cheesecake, baked in a standard muffin tin. They slide out perfectly every time, look like they came from a fancy catering tray, and require zero springform engineering.
You’ll Need
- 12 chocolate sandwich cookies (whole)
- 16 oz cream cheese
- ½ cup sugar, 1 tsp vanilla
- 2 eggs
- Toppings: jam, berries, caramel, or cocoa
The Method
- Line muffin tin with paper liners.
- Place one whole cookie in the bottom of each.
- Beat cream cheese, sugar, vanilla, eggs until smooth.
- Fill liners ¾ full. Bake at 325°F for 20-22 min.
- Cool, chill, top before serving.
Basque Burnt Cheesecake
45 minutesThis is the only cheesecake on the internet where a cracked, dark, rustic top is the goal. It’s supposed to look wild and scorched — that’s its entire personality. Underneath, the interior is impossibly creamy, almost custardy. Genuinely one of the most impressive-looking desserts in existence for the effort involved.
You’ll Need
- 24 oz cream cheese
- 1½ cups sugar
- 5 eggs
- 1½ cups heavy cream
- ¼ cup flour
- 1 tsp vanilla, pinch salt
The Method
- Line an 8-inch pan with parchment (let it overhang).
- Blend all ingredients in a blender until smooth.
- Pour into pan. Bake at 450°F for 35 min.
- Top will be dark brown, almost burnt. It’s perfect.
- Cool completely. Slice. Accept the compliments.

Plating Essential
Ceramic Ramekins & Dessert Cups That Elevate Everything
The single cheapest upgrade to your dessert game. A set of matching 6-oz ramekins instantly turns any mousse, custard, or parfait into something that looks like it came from a bistro kitchen.
See Top Picks →08. Puff Pastry Shortcuts
A single sheet of frozen puff pastry is one of the most powerful ingredients in a modern kitchen. Here’s how to use it to make desserts that look like they took bakery-school training.
Frozen puff pastry is an honest-to-goodness shortcut, not a compromise. Most professional bakeries use commercial laminated doughs for a reason: hand-making puff pastry takes hours and temperature precision that home cooks rarely want to deal with. The recipes below lean on pre-made pastry the way a chef would — as a starting point for something spectacular.
Rustic Fruit Galette
30 minutesThe whole point of a galette is that it’s supposed to look imperfect. Fold the edges over the fruit however they fall, brush with egg, bake. You’ve just made one of the most photogenic desserts in existence with one sheet of pastry and whatever fruit is on your counter.
You’ll Need
- 1 sheet puff pastry, thawed
- 3 cups sliced fruit (apples, berries, peaches)
- 3 tbsp sugar + pinch of cinnamon
- 1 tbsp cornstarch
- 1 egg beaten with water
- Coarse sugar for topping
The Method
- Toss fruit with sugar, cinnamon, cornstarch.
- Roll pastry on parchment; pile fruit in center.
- Fold edges up over fruit, leaving center exposed.
- Brush with egg wash, sprinkle with coarse sugar.
- Bake at 400°F for 25-30 min until deeply golden.
Nutella Palmiers (Elephant Ears)
20 minutesThese little heart-shaped pastries look like they came from a Parisian boulangerie and require three ingredients. Roll pastry with chocolate-hazelnut spread, slice, bake. The laminated layers puff dramatically, the chocolate crisps at the edges, and everyone assumes you got up at 5 AM to make them.
You’ll Need
- 1 sheet puff pastry, thawed
- ⅓ cup chocolate-hazelnut spread
- Sugar for sprinkling
- Flaky salt (optional but recommended)
The Method
- Spread pastry with warmed Nutella.
- Roll both long sides to meet in the middle.
- Chill 15 min so it slices cleanly.
- Slice into ½-inch pieces, sprinkle with sugar.
- Bake at 400°F for 14 min, flipping halfway.
Apple Rose Tarts
35 minutesThese look like they were assembled by a pastry school graduate and they’re actually just rolled-up ribbons of thinly sliced apple in a strip of puff pastry. When baked, the apple ribbons curl outward into unmistakable roses. The first time you make these, take photos — nobody will believe you.
You’ll Need
- 1 sheet puff pastry, cut into 6 strips
- 2 red apples, thinly sliced
- 3 tbsp apricot jam, warmed
- Lemon juice, cinnamon
- Powdered sugar for dusting
The Method
- Microwave apple slices in water with lemon 3 min to soften.
- Brush pastry strips with jam, dust with cinnamon.
- Overlap apples along top edge, skins up.
- Fold bottom over, roll up into a rose.
- Place in muffin tin; bake at 375°F for 25 min. Dust with sugar.
09. Single-Serving Stunners
Small portions feel luxurious because restaurants taught us they are. A dessert served in its own vessel lands entirely differently than the same dessert scooped from a casserole dish.
There’s a psychology to individual desserts. When each guest gets their own little vessel of something, the meal becomes an event. The portion feels considered. The plating feels intentional. And critically — you, the host, get to assemble one portion at a time rather than trying to slice a cake perfectly in front of twelve expectant faces.
Microwave Molten Chocolate Mug Cake
4 minutesA hot, gooey, chocolate-oozing cake in your favorite mug, finished in under four minutes. The only truly “emergency dessert” that still photographs beautifully. Dust with powdered sugar, add a scoop of ice cream, and nobody suspects the microwave.
You’ll Need
- 4 tbsp flour
- 4 tbsp sugar
- 2 tbsp cocoa
- ¼ tsp baking powder
- 3 tbsp milk + 2 tbsp oil
- 1 square dark chocolate
The Method
- Whisk dry ingredients in mug.
- Add milk, oil, and splash of vanilla.
- Push chocolate square into the center.
- Microwave 70-90 seconds. Edges set, center molten.
- Dust with powdered sugar and serve with ice cream.
Layered Banoffee Trifles
10 minutesThe British pub classic — bananas, toffee, cream, biscuit — reimagined as individual glasses. The layers are visible through the side of the glass, which is half the point. Bonus: you can build these in assembly-line fashion while watching TV.
You’ll Need
- 1½ cups crushed digestive biscuits
- 1 jar dulce de leche (or thick caramel)
- 3 bananas, sliced
- 2 cups whipped cream
- Grated chocolate for top
The Method
- Spoon biscuit crumbs into glasses (about 2 tbsp).
- Drizzle generously with dulce de leche.
- Layer banana slices.
- Top with piped whipped cream.
- Finish with grated chocolate and one banana slice.
10. Holiday-Worthy Desserts
For the moments when a dessert needs to feel like an occasion. These recipes carry enough visual drama to anchor a dinner party — while still demanding almost nothing of the cook.
Holiday desserts have to carry extra weight. They’re usually the conversation piece of the meal, the thing people photograph and remember. The recipes here are built to do that work on your behalf. Each one has a signature visual element — a sculptural shape, a dramatic color, an unexpected component — that draws attention and earns credit disproportionate to the effort involved.
Ruby Pomegranate Trifle Bowl
25 minutesLayered in a clear glass trifle bowl, this is one of the most visually arresting desserts you can bring to a holiday table. Crimson pomegranate arils against snow-white cream against deep red jellied fruit — it genuinely looks like a gemstone display.
You’ll Need
- 1 pound cake, cubed
- ½ cup pomegranate juice for soaking
- Vanilla custard or pastry cream
- 2 cups heavy cream, whipped
- 2 cups pomegranate arils
- White chocolate shavings
The Method
- Soak cake cubes briefly in pomegranate juice.
- Layer in trifle bowl: cake → custard → arils.
- Repeat 2-3 times, ending with whipped cream.
- Top with a generous mound of arils.
- Finish with white chocolate shavings.
Chocolate-Dipped Shortbread Wands
25 minutesLong, slender shortbread sticks — half-dipped in dark chocolate and rolled in toppings — served standing upright in a glass. They look like edible art installations. Excellent gift wrapped in parchment and twine.
You’ll Need
- 1 roll refrigerated shortbread (or homemade)
- 8 oz dark chocolate, melted
- Toppings: crushed freeze-dried berries, chopped nuts, sprinkles, gold dust
- Flaky salt
The Method
- Cut shortbread into long rectangles, bake per package.
- Cool completely.
- Dip each half into melted chocolate.
- Roll dipped ends in toppings while chocolate is wet.
- Let set on parchment 20 min. Stand in a glass to serve.
11. Decoration Tricks That Fool Everyone
The finishing touches that turn a homemade dessert into a bakery display. None of these require special tools. All of them make people assume you took a class.
The difference between a dessert that tastes great and a dessert that looks like it came from a fine patisserie is almost always in the final minute of plating. Professional bakeries don’t have secret ingredients you don’t have access to — they have finishing habits that home cooks haven’t learned yet. Here are the most impactful ones.
The powdered sugar stencil. Place a doily, a geometric cutout, or even a few leaves on top of a cake, then dust heavily with powdered sugar. Remove the stencil carefully. You now have a patterned top that looks like it required an airbrush and a decorating degree. Total time: 30 seconds.
The single macaron trick. A single store-bought macaron placed on top of any cupcake, mousse cup, or slice of cake instantly transforms it. The color and round shape telegraph “bakery dessert” so strongly that the eye stops questioning the rest of the plate.
The chocolate drip. Pour slightly warm chocolate ganache over the top edge of a frosted cake and let gravity pull it down the sides in irregular drips. This is the single most-photographed cake technique on the internet and it takes about 90 seconds to execute once you’ve seen it done.
The negative space rule. The most expensive-looking plated desserts have large amounts of empty plate around them. Resist the instinct to fill the plate. One small, centered dessert on a large plate reads as fine dining. A plate covered edge-to-edge reads as cafeteria.
The edible flower. A single unsprayed pansy, violet, or nasturtium petal placed deliberately will elevate absolutely anything. Farmers’ markets often sell them; some grocery stores carry microgreens with edible blossoms. Use exactly one.
Quick Reference: Matching Decoration to Dessert
| Dessert Type | Best Finishing Touch | What To Avoid |
|---|---|---|
| Chocolate cake | Glossy drip, sea salt, single berry | Crowded sprinkles, food dye |
| Cheesecake | Compote ribbon, powdered sugar dust | Canned pie filling atop whole cake |
| Fruit tart | Apricot glaze for shine, mint leaf | Over-glazing, uneven fruit sizes |
| Mousse cups | Chocolate shards, whipped cream swirl | Plastic decorations, neon sprinkles |
| Pavlova | Torn mint, varied berry sizes | Uniform berry placement |
| Trifle | Grated chocolate, single garnish on top | Mixed jumbled toppings |
| Pound cake | Light glaze, flaky salt | Thick store-bought frosting |
12. Pro Tools & Time-Savers
The small pieces of equipment that quietly make everything look better. None are expensive. All are worth owning if you make desserts more than a few times a year.
Your technique can only carry a dessert so far when the tools you’re working with work against you. The list below is every item that’s shown up again and again in the recipes here — the minimum viable dessert kit. If you own all of these, you can execute any recipe on this page beautifully. If you own none, every recipe will still work, but the finish will show it.
| Tool | Why It Matters | Budget Range |
|---|---|---|
| Small offset spatula | Professional-looking frosting swoops | $6–$12 |
| Hand mixer (5-speed) | Whipped cream, mousse, meringue | $25–$60 |
| Piping bags + couplers | Instant upgrade to any topping | $10–$20 |
| Matching ramekins set | Individual portions = fine dining look | $18–$40 |
| Stand mixer | Hands-free for serious bakers | $250–$500 |
| Microplane zester | Fine zest, chocolate shavings | $15–$25 |
| Bench scraper | Smooth cake sides instantly | $8–$14 |
| Heavy sheet pans | Even browning, no warping | $25–$50 each |
| Digital kitchen scale | Consistent results, easy cleanup | $15–$30 |
| Silicone spatulas | Clean folding, full bowl emptying | $10 for a set |
If you can only buy three things
Buy a 5-speed hand mixer, a microplane, and a small offset spatula. Those three tools alone will visibly improve every dessert you make for approximately $50 total. Everything else is nice to have.
One last thing worth mentioning in the tools conversation: your storage and serving vessels matter as much as your prep tools. A footed cake stand turns any cake into a centerpiece. A wooden board makes shards of bark look like something from a farmers-market display. A plain white rectangular platter makes fruit arrangements look editorial. These objects don’t make your desserts better — they just let the work you already did actually be seen.
13. One Last Recipe — The Signature Dessert
If you only make one thing from this entire guide, make this. It’s the house special — the recipe that looks like it took three hours and actually takes twenty minutes.
The 20-Minute Chocolate Ganache Tart
20 min + chillA tart so glossy it mirrors the room. The crust is crushed cookies pressed into a tart pan. The filling is ganache — chocolate plus hot cream, stirred — poured in and left to set. The top is smooth as a mirror. One perfect tart, no skill required, served in wedges that look like they came from a fine patisserie.
You’ll Need
- 2 cups chocolate cookie crumbs
- 6 tbsp melted butter
- 12 oz dark chocolate, finely chopped
- 1¼ cups heavy cream
- 2 tbsp butter
- Flaky salt & berries to finish
The Method
- Mix crumbs with melted butter, press into 9-inch tart pan.
- Chill 15 minutes (or bake 10 min at 350°F for a crisper crust).
- Heat cream to almost-boiling; pour over chopped chocolate.
- Wait 3 min, stir smooth, add butter.
- Pour into crust. Chill until set (3 hours).
- Finish with flaky salt and berries just before serving.

For Gift Giving
Baking Essentials Gift Set — Perfect for New Home Bakers
A curated starter set with mixing bowls, a whisk, measuring cups, and an offset spatula — everything needed to execute the recipes in this guide. Also an excellent housewarming, wedding, or birthday gift for someone getting into baking.
See Gift Options →Frequently Asked Questions
Everything readers ask most often about pulling off impressive desserts quickly — answered honestly.
What’s genuinely the easiest dessert on this list for a complete beginner?
The balsamic roasted strawberries (Recipe #7) and the dark chocolate bark (Recipe #9). Both require zero technique, no special tools, and produce a result that looks expensive. The bark especially is nearly impossible to mess up — melting chocolate and scattering toppings is the entire process. The berries are forgiving because the oven does all the work while you ignore it.
Can I make most of these desserts ahead of time?
Yes — and most of them are actually better made ahead. The tiramisu, icebox cake, semifreddo, cheesecake jars, and panna cotta all improve overnight. The rule of thumb: anything that sets in the fridge benefits from at least 4 hours and most benefit from overnight. Things baked like the flourless torte or apple roses are best eaten the same day.
The only desserts you should assemble at the last minute are the pavlova (meringues soften quickly), the affogato (obviously), and anything with bananas (they brown).
What’s the secret to that glossy finish on ganache?
Three things, in order of importance. First, use real chopped chocolate, not chocolate chips — chips contain stabilizers that dull the shine. Second, don’t overheat the cream; it should be hot enough to melt chocolate but not boiling. Third, stir gently from the center outward in small circles rather than beating. Overstirring incorporates air bubbles that matte the surface.
For truly mirror-finished ganache tarts, tap the finished tart gently on the counter right after pouring to pop surface bubbles.
Do I need a stand mixer to make these recipes?
Absolutely not. A $30 hand mixer handles everything in this guide. A stand mixer is a convenience, not a requirement — it’s faster and more hands-off, but the results from a hand mixer are identical for whipped cream, mousse, and meringue-style mixing. Several recipes here don’t require any mixer at all.
If you’re shopping for one, this stand mixer comparison guide covers the options thoroughly.
How do I keep whipped cream from deflating on my desserts?
Three techniques: first, chill your bowl and beaters in the freezer for 10 minutes before whipping. Cold equipment creates stiffer, more stable peaks. Second, don’t overwhip — stop at stiff peaks, not beyond. Overwhipped cream turns grainy and separates. Third, for desserts that need to hold for more than a few hours, add 1 tsp of powdered sugar mixed with 1 tsp of cornstarch per cup of cream. This stabilizes the whip for up to 24 hours without any chemical aftertaste.
What chocolate should I buy for these recipes?
For anything where chocolate is the star flavor — ganache, truffles, mousse, the tart — buy chocolate you’d happily eat as a bar. Look for 60-70% cacao for most recipes; it has richness without bitterness. Brands like Ghirardelli, Valrhona, Callebaut, and Guittard are all widely available and deliver bakery-quality results.
Chocolate chips are fine for things like bark or cookies but not for smooth applications like ganache. The stabilizers that keep chips in their shape while baking also prevent them from melting silkily.
Can these desserts be made gluten-free?
Many of them already are. The flourless chocolate torte, pots de crème, mousse, pavlova, truffles, bark, and most fruit-based desserts are naturally gluten-free. For cookie-crust desserts like cheesecake jars or the ganache tart, swap in gluten-free sandwich cookies or almond-flour shortbread. For puff pastry recipes, gluten-free puff pastry exists in specialty stores and freezer sections, though it handles slightly differently — keep it colder while working.
How long do homemade truffles and bark last?
Stored in an airtight container in the fridge, chocolate truffles last 2 weeks and dark chocolate bark lasts up to 3 weeks. At room temperature in a cool, dry spot, bark holds for about 5-7 days before the chocolate starts to lose snap. If you’re gift-wrapping either as a present, make them within 3-4 days of delivery for peak texture.
Never freeze truffles — the freezer causes “chocolate bloom,” a white haze that doesn’t affect taste but looks unappetizing.
What if my dessert doesn’t look as pretty as the photos?
Honestly? Almost nobody’s first attempt does. Plating is a skill that gets noticeably better after about three attempts with the same recipe. The easiest fixes: use a smaller plate than you think you need (negative space helps), place one signature garnish instead of many scattered ones, and photograph in natural daylight. These three changes alone close 80% of the gap between “homemade” and “bakery.”
Which of these desserts works best for a dinner party?
The best dinner-party desserts are the ones you make entirely in advance so you’re not in the kitchen while guests arrive. Top picks: the strawberry tiramisu in glasses, the no-bake lemon cheesecake jars, the Basque burnt cheesecake, the semifreddo, and the ruby pomegranate trifle. All can be built the day before and just pulled out when dessert time arrives.
Save theatrical desserts like the affogato for small, seated dinners where the tableside pour is part of the experience.
Are these recipes kid-friendly to help make?
Many are excellent for kids. The dark chocolate bark, the Nutella palmiers, the frozen yogurt bark, and the icebox cake are all basically assembly projects — perfect for small hands. The mug cake is a rite of passage for teenagers. Avoid recipes involving hot caramel or boiling poaching liquids for younger kids.
How do I adapt these recipes for dietary restrictions?
For diabetic-friendly options, our guide to the best dessert recipes for diabetics covers low-sugar swaps that still taste indulgent. For dairy-free, swap coconut cream for heavy cream in most no-bake applications — it whips similarly and adds a faint tropical note that pairs well with chocolate and tropical fruit. For eggs, silken tofu blended smooth stands in beautifully in mousse and cheesecake recipes.
Your Next Dessert, Reimagined
You now have 27 different ways to arrive at the table with something that looks like it took half a day and actually took a commercial break. The most important thing to remember isn’t the recipes themselves — it’s the mindset behind them. Great desserts aren’t about complexity. They’re about contrast, height, restraint, and a little bit of deliberate theater at the plating stage.
Start with the one recipe that matches what you already have in your kitchen tonight. Make it once, see how it lands, and add one more to your repertoire next week. Within a month, you’ll be the person at every gathering who mysteriously “always brings the best dessert” — and you’ll know the secret is that it was easier than anyone suspects.
Go make something beautiful. Nobody has to know how fast it was.
Jump Back to the Start →