How Do You Barbecue Turkey?
Every Step, Every Secret, Every Bite
Low-and-slow smoke, perfect brine, crispy skin, and juicy breast meat — the complete guide from raw bird to carved masterpiece.
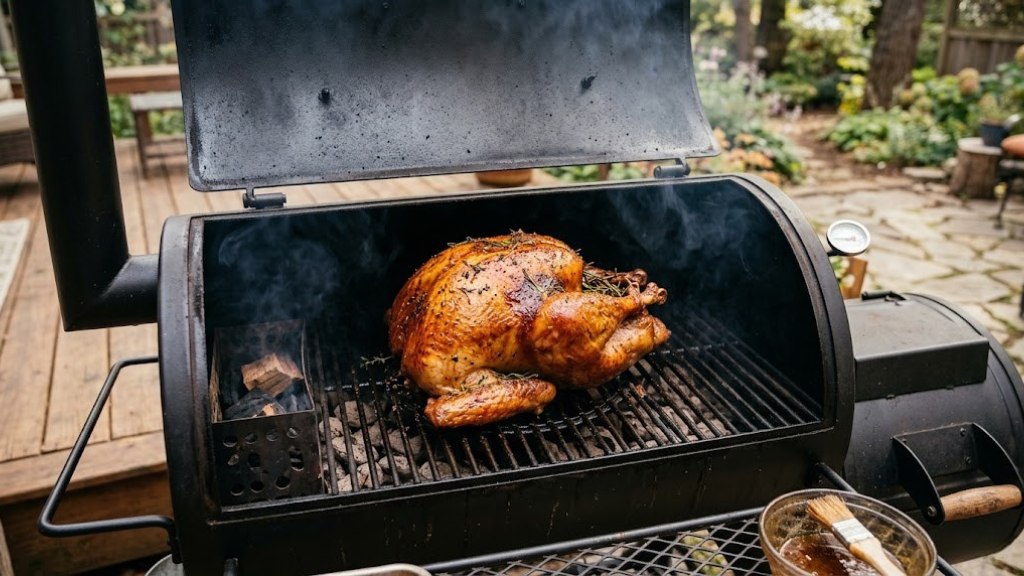
Barbecuing a turkey might be the single greatest upgrade you can make to your holiday table — or any weekend cook. Done right, it delivers smoke-perfumed meat, shatteringly crispy skin, and a level of flavor that oven-roasted turkey simply cannot match.
Why Barbecue Turkey? The Case for Ditching the Oven
Let’s be honest about the oven-roasted turkey problem. Even perfectly executed, it produces meat that’s fine — sometimes genuinely good — but rarely remarkable. The bird sits in a closed, moist environment that steams as much as it roasts, which is why the skin is so often pale and flabby, and why the breast invariably dries out long before the thighs finish cooking. The oven gives you control without drama, which is both its strength and its limitation.
The barbecue does something completely different. Whether you’re running a charcoal kettle, a pellet smoker, or a gas grill rigged for indirect heat, the open fire environment creates the conditions for genuine flavor transformation. The smoke penetrates the meat, producing a subtle pink smoke ring just beneath the skin and a flavor that no amount of herbs or butter injected into an oven-bird can replicate. The dry, circulating heat of a properly set-up grill crisps the skin in a way that leaves oven results looking genuinely inadequate by comparison.
And there’s the practical argument too. When you’re cooking Thanksgiving or a large gathering, the oven is typically occupied with sides, pies, and casseroles for the entire day. Moving the turkey to the grill or smoker frees up that oven space completely and turns the main event into something the neighbors will genuinely envy.
Barbecued turkey also scales beautifully. A 12-pound bird feeds 10–12 people comfortably, and if you need more, running two smaller birds simultaneously on a large grill produces better results than wrestling with a 20-pound single bird. The sweet spot is two 10–12 pound birds — faster cooking, more even smoke penetration, and twice the drumsticks for the people who always argue over them.
Smoke penetration and dry heat create complex flavor profiles impossible in an oven.
Circulating dry heat on the grill crisps skin far more effectively than oven steam.
Your oven stays available for sides, pies, and casseroles all day long.
A smoked turkey carving station makes any gathering more memorable.
Indirect heat on a grill solves the breast-vs-thigh timing problem better than direct oven heat.
Two smaller birds cook faster and more evenly than one massive bird.
Choosing the Right Turkey for the Barbecue
Not every turkey from the supermarket shelf is equally suited to the barbecue, and the choices you make before you light a single coal have a significant effect on the final result. Size, breed, preparation style, and whether the bird has been pre-seasoned or enhanced all matter — and some options actively work against you on the grill.
Fresh vs. Frozen
Fresh turkeys are almost always the better choice for barbecue. They haven’t been through the ice-crystal-rupturing freeze-thaw cycle that damages cell walls and leads to moisture loss during cooking. That said, a properly thawed frozen turkey (allowed to defrost slowly in the refrigerator over 3–4 days for a 12-pound bird) produces perfectly acceptable results. The critical mistake is trying to rush the thaw — never defrost a turkey at room temperature or in warm water, as these methods create food-safety hazards.
Natural vs. Enhanced
Enhanced turkeys — labeled “basted,” “self-basting,” or “contains up to 8% retained water” — have been injected with a solution of salt water, broth, and sometimes flavorings. If you’re buying one of these, do not brine it separately; the added salt will make the result aggressively salty. Natural turkeys (no added solutions) give you full control over seasoning and respond best to a custom brine.
Size Guidelines
| Turkey Size | Feeds | Time at 225°F | Time at 325°F | BBQ Suitability |
|---|---|---|---|---|
| 8–10 lbs | 6–8 people | 4–5.5 hours | 2.5–3 hours | Excellent |
| 10–12 lbs | 8–10 people | 5.5–7 hours | 3–3.5 hours | Excellent |
| 12–14 lbs | 10–12 people | 6.5–8 hours | 3.5–4 hours | Ideal Range |
| 14–16 lbs | 12–14 people | 7.5–9.5 hours | 4–5 hours | Manageable |
| 16–18 lbs | 14–16 people | 9–11 hours | 5–6 hours | Challenging |
| 18+ lbs | 16+ people | 11+ hours | 6+ hours | Two birds better |
Natural or organic turkey, 10–14 lbs — fresh if possible. Check the label: no “self-basting” or “enhanced” language if you plan to brine. Heritage breed turkeys (Bourbon Red, Narragansett) have more flavor than commercial broad-breasted whites but can be harder to find and cost significantly more.

Monitor breast and thigh temperature simultaneously from 300ft away. Essential for a perfect barbecue turkey every single time — never guess, never overcook.
Brining — The Step That Separates Good from Great
If there is a single technique that makes the biggest difference between a merely adequate barbecue turkey and one that people talk about for years afterward, it is brining. The science is straightforward: dissolved salt in water causes osmosis, drawing moisture into the meat cells while simultaneously denaturing surface proteins in a way that allows them to hold more liquid during the heat of cooking. The result is meat that starts the cook with significantly more moisture — and therefore finishes it with more, too.
You have two main options: wet brine or dry brine. Both work. Each has genuine trade-offs.
- ✓ Maximum moisture retention in meat
- ✓ Can add aromatics directly to liquid
- ✓ Works in as little as 12 hours
- ✓ Very forgiving and beginner-friendly
- ✗ Requires a large container (5-gallon bucket or bag)
- ✗ Needs refrigerator space for 12–24 hours
- ✗ Wet skin can struggle to crisp on the grill
- ✗ More cleanup and preparation involved
- ✓ No container needed — just the turkey in the fridge
- ✓ Produces significantly crispier skin
- ✓ Concentrated flavor without dilution
- ✓ Cleaner, less messy process
- ✗ Needs 24–48 hours ideally (less forgiving timeline)
- ✗ Slightly less moisture penetration than wet brine
- ✗ Easy to over-salt if applied too heavily
- ✗ Less room for aromatic infusion
Base brine: Combine 1 gallon of cold water, 1 cup kosher salt (½ cup table salt), and ½ cup brown sugar. Stir until dissolved. Add aromatics: 4 smashed garlic cloves, 2 bay leaves, 1 tablespoon black peppercorns, the peel of one orange, and 4 sprigs of fresh thyme. For large turkeys (12+ lbs), double or triple the recipe to fully submerge the bird.
Process: Submerge the turkey completely in the brine in a 5-gallon food-safe bucket or large brining bag. Refrigerate at 40°F or below for a minimum of 12 hours, ideally 18–24 hours. Do not exceed 24 hours or the meat can become too salty and mushy at the surface.
After brining: Remove the turkey, rinse thoroughly under cold water (very important — removes excess surface salt), and pat completely dry inside and out with paper towels. Place on a rack over a sheet pan and refrigerate uncovered for at least 4 hours, preferably overnight. This air-drying step is what makes the skin crispy.
Mix 1 tablespoon of kosher salt per 5 pounds of turkey with 1 teaspoon each of black pepper and garlic powder. Separate the skin from the breast with your fingers and apply half the salt mixture directly to the breast meat under the skin. Apply the rest over the entire exterior. Place uncovered on a rack in the refrigerator for 24–48 hours. The salt will draw moisture out initially, then it reabsorbs with the now-dissolved salt throughout the meat. Do not rinse before cooking.
Rubs and Seasoning: Building Flavor from the Outside In
A good rub does two things: it contributes flavor, and it helps form the bark — the caramelized, slightly crunchy exterior crust that is one of barbecue’s defining textural pleasures. For turkey, the challenge is that the skin acts as a barrier. Fat and oil in the skin can prevent the seasoning from reaching the meat directly. The solution is straightforward: get the rub under the skin wherever possible, and then apply a second layer on top of the skin for color and crust formation.
Compound Butter Rub Method
The most effective delivery system for under-skin seasoning is compound butter: softened unsalted butter blended with aromatics, herbs, and spices. The fat carries flavor deep into the breast meat, the butter bastes the meat as it melts during cooking, and it ensures the spices make direct contact with the flesh rather than sitting on top of the fat layer in the skin.
Soften ½ cup of unsalted butter to room temperature. Blend in: 2 tablespoons smoked paprika, 1 tablespoon garlic powder, 1 tablespoon dried thyme (or 2 tablespoons fresh), 1 teaspoon black pepper, 1 teaspoon onion powder, 1 teaspoon dried rosemary (crumbled), and ½ teaspoon cayenne if you want subtle heat. Separate the skin from the breast and thighs with your fingers, being careful not to tear it. Push half the butter mixture under the skin and spread it across the breast and thigh meat. Apply the remaining butter over the entire exterior of the bird.
For the exterior dry rub (on top of the butter layer): combine 1 tablespoon brown sugar, 2 teaspoons smoked paprika, 1 teaspoon black pepper, and 1 teaspoon salt. The sugar helps caramelization and color development during the cook. If you dry-brined the turkey, skip any additional salt in the exterior rub.
For those who want to explore a wider range of rub options — from sweet and mild to bold and spicy — our comprehensive guide to the best barbecue rubs covers pre-made options that deliver excellent results on poultry without the prep work of a homemade blend.
Fill the cavity with: half an orange (squeezed in and left inside), half a head of garlic (cut across the equator, unpeeled), a halved onion, and 4–5 sprigs of fresh thyme and rosemary. These aromatics won’t dramatically flavor the meat internally, but they do contribute to the aromatic steam inside the cavity and make the bird smell extraordinary while it cooks.
Grill and Smoker Setup: Getting Your Equipment Ready
Almost any outdoor cooking setup can produce excellent barbecue turkey — the key is knowing how to configure it for indirect heat and sustained, controlled temperature over a long cook. Here’s how to approach the most common equipment types.
Pellet Smoker (Easiest, Most Consistent)
A quality pellet smoker is the most beginner-friendly option for barbecue turkey. Set the temperature and it holds it automatically, adding controlled amounts of wood smoke throughout the cook. Set it to 225°F for the first 2 hours to build smoke flavor, then raise to 325°F to finish and crisp the skin. For a pellet smoker overview, our best electric barbecue smokers guide covers the top options at every price point.
Charcoal Kettle Grill
The charcoal kettle grill is arguably the most rewarding setup for turkey — the combination of charcoal heat and wood smoke produces exceptional results, and the setup is simpler than many people assume. Bank the coals to one side (or use a charcoal separator to create two coal beds on either side with the turkey in the middle over a drip pan). Aim for 325°F–350°F with the lid on and vents adjusted to maintain temperature. Add wood chunks (not chips) directly to the coals for smoke every 45–60 minutes.
Offset Smoker
An offset smoker gives you the most traditional barbecue result — pure wood and coal smoke, the most authentic pit flavor, and the most control over the process. It also requires the most active management: you’re feeding the firebox every 45–60 minutes to maintain consistent heat, and temperature management demands more attention than set-it-and-forget-it alternatives. The reward is a bird with a more pronounced smoke ring and deeper, more complex flavor than any electric or pellet alternative can match.
Gas Grill Setup for Indirect Heat
A gas grill can produce excellent turkey results when set up correctly for indirect cooking. On a 3-burner grill: light the two outer burners and leave the center burner off. Place the turkey on the center grate over the unlit burner. This creates a convection-style environment with heat circulating around the bird without direct flame underneath. Add a smoke box or foil pouch of soaked wood chips over one of the lit burners for smoke flavor. Target 325°F–350°F throughout the cook.
Always use a drip pan beneath the turkey to catch fat drippings. Fat dripping onto flames causes flare-ups that can char the skin, spike temperatures dangerously, and — in worst cases — start grill fires. The drip pan should be positioned below the bird but above the unlit portion of the grill. Fill it halfway with water or apple cider to add humidity and prevent drippings from burning.

Precise temperature control from 180°F to 500°F. PID controller holds your target within 5°F. Huge cooking surface fits a 16-lb turkey with room for sides. Read our full smoker comparison first.
Wood Selection: Matching Smoke to Poultry
Wood selection is one of the most consequential decisions in the barbecue process, and with turkey it’s particularly important because the meat is more delicately flavored than pork or beef. The wrong wood — or too much of a strong wood — can overwhelm the turkey’s flavor entirely, producing a result that tastes bitter and acrid rather than beautifully smoked. The right wood adds a subtle, complementary note that makes every bite more interesting without announcing itself aggressively.
The general principle: fruit woods and nut woods first, strong hardwoods sparingly if at all.
- Mild, sweet, slightly fruity smoke
- Complements turkey perfectly
- Produces beautiful golden color
- Very forgiving — hard to overdo it
- Works for whole cook duration
- Mild-medium sweet smoke
- Adds deep mahogany color to skin
- Slightly richer than apple
- Mixes beautifully with apple 50/50
- Excellent for holiday presentation
- Rich, nutty, medium smoke intensity
- More complex than fruit woods
- Use sparingly — 1–2 chunks max
- Excellent paired with apple or cherry
- Adds savory depth to the flavor
- Mesquite: too aggressive, bitter
- Heavy hickory: overpowers turkey
- Softwoods: toxic resin (pine, cedar)
- Treated wood: dangerous chemicals
- Green/wet wood: acrid, harsh smoke
Chips vs. Chunks: Which to Use
For turkey on a charcoal or offset smoker, always use wood chunks rather than chips. Chunks burn slowly for 45–60 minutes of sustained smoke; chips flare and burn out in 10–15 minutes, requiring constant attention. For gas grills where you can’t place chunks directly on the burner, use a smoke box filled with soaked chips or pellets placed directly over a lit burner. For pellet smokers, the pellet type determines the smoke flavor — simply load your preferred pellets.
The Full Step-by-Step Barbecue Turkey Method
Here is the complete process from cold bird to rested, carved masterpiece. Follow these steps in order and you’ll produce a result that makes people rethink everything they thought they knew about turkey.
-
1Day Before: Brine and Air-Dry (12–24 hours before cook)Wet brine for 12–24 hours, or dry brine for 24–48 hours. After the wet brine, rinse thoroughly and pat dry. After either brine method, place the turkey uncovered on a rack in the refrigerator for at least 4 hours (overnight is ideal) to dry the skin surface completely. Dry skin = crispy skin.
-
2Day Of: Temper the Bird (1–1.5 hours before cook)Remove the turkey from the refrigerator and let it sit at room temperature for 60–90 minutes before it goes on the grill. This tempers the meat so the center is not ice-cold, leading to more even cooking and reducing the total cook time slightly. Do not skip this step for large birds.
-
3Apply Compound Butter and Exterior RubApply the compound butter under the skin and over the entire exterior of the bird. Apply the dry rub over the butter layer. Fill the cavity with aromatics (orange, garlic, onion, herbs). Tie the legs together loosely with butcher’s twine — this helps the bird cook slightly more evenly and makes presentation cleaner.
-
4Set Up Grill for Indirect Heat — Target 225°FSet up your grill for indirect cooking as described in Section 5. Place a drip pan beneath where the turkey will sit, half-filled with hot water and apple cider. Get the temperature stabilized to 225°F–250°F before the bird goes on. Add your first wood chunks or chips. Wait until you see thin blue smoke (not white billowing smoke) before placing the turkey.
-
5Place Turkey Breast-Side Up, Add Probe ThermometerPlace the turkey breast-side up on the indirect heat zone above the drip pan. Insert one probe thermometer into the thickest part of the breast (not touching bone) and a second into the thigh. Close the lid and don’t open it for the first hour. Each time you open the lid, you drop the temperature significantly and extend the cook time.
-
6Maintain Temperature and Add Smoke Wood as NeededCheck and adjust vents or burner levels every 30–45 minutes to maintain target temperature. Add wood chunks every 45–60 minutes for the first 3 hours of the cook — after that, the meat stops absorbing meaningful smoke flavor and additional wood only creates an overly heavy smoke taste. Refill the water pan if it runs low.
-
7The Texas Crutch (Optional but Recommended for Juiciness)When the breast temperature hits 155°F, tent the turkey loosely with foil or wrap the breast portion only in a layer of foil. This is the “Texas Crutch” — it slows the moisture loss from the surface while the interior catches up to final temperature. Remove the foil in the last 20–30 minutes to recrisp the skin.
-
8Raise Temperature to 375°F for Crispy Skin FinishWhen the breast hits 155°F (after removing the foil), raise the grill temperature to 375°F–400°F. This final high-heat blast crisps and colors the skin. Monitor closely — this stage typically takes 20–30 minutes and can go from perfect to overdone quickly.
-
9Pull at 160°F Breast / 170°F Thigh and RestPull the turkey off the grill when the breast registers 160°F and the thigh 170°F — carryover cooking will bring both to their safe final temperatures (165°F and 175°F respectively) during the rest. Transfer to a large cutting board, tent loosely with foil, and rest for a minimum of 30 minutes. 45–60 minutes is better for a large bird. Cutting too early wastes all the moisture you worked to preserve.
-
10Carve and ServeRemove the legs and thighs first by cutting through the joint. Remove the breast halves by cutting along the breastbone and then slicing. Fan the breast slices on a serving platter, arrange the legs and wings around them, and serve immediately. The skin will soften after carving — serve quickly for maximum crispness.
Temperature and Timing: The Numbers That Matter Most
Temperature is not a suggestion in barbecue turkey — it is the single most important variable separating a dry, overcooked bird from a juicy, perfectly rendered one. A good wireless dual-probe thermometer is not optional equipment; it is the tool that makes everything else possible. Cook by temperature, not by time.
Low-and-Slow vs. Hot-and-Fast: Which Method?
| Method | Smoker Temp | Time (12 lb) | Smoke Flavor | Skin Result | Best For |
|---|---|---|---|---|---|
| Low & Slow | 225°F–250°F | 6–8 hours | Maximum | Needs finish blast | Maximum smoke flavor |
| Hot & Fast | 325°F–350°F | 3–4 hours | Good | Naturally crisper | Weeknight / time-limited cooks |
| Hybrid (225→325) | 225°F then 325°F | 4–6 hours | Very Good | Excellent | Best of both worlds — recommended |
| Spatchcock 325°F | 325°F–350°F | 2.5–3.5 hours | Good | Excellent — max crisp | Speed + even cooking |
Start at 225°F for the first 2 hours to build maximum smoke flavor. Then raise to 325°F for the remainder of the cook. This gives you the smoke penetration of a slow cook with the skin-crisping and reasonable timing of a hot cook. Finish with a 375°F blast for the last 20–30 minutes when the breast hits 155°F. This is the method that produces the most consistently excellent results across all grill types.
The Spatchcock Method: Faster, Crispier, More Even
Spatchcocking — removing the backbone and flattening the turkey so the whole bird lies in a single plane — is the single most transformative technique available to the barbecue turkey cook. It looks intimidating the first time. It isn’t. And the results are consistently better than a whole unmodified bird in almost every measurable way.
Why Spatchcocking Works So Well
A whole turkey is deeply problematic from a heat-transfer perspective. The breast is exposed on top and cooks fastest. The thighs are protected beneath the body and cook slowest. By the time a traditional whole bird’s thighs reach 175°F, the breast has often been at 165°F+ for 30–45 minutes — dried out and overcooked. Spatchcocking eliminates this problem by placing breast and thigh in the same heat environment simultaneously. They reach target temperatures within 10–15 minutes of each other instead of 45.
How to Spatchcock a Turkey
- 1Place the turkey breast-side down on a stable cutting boardMake sure you have a large, non-slip surface. Tuck paper towels under the cutting board to prevent it from sliding.
- 2Cut along both sides of the backbone with poultry shearsUse heavy-duty poultry shears (not kitchen scissors) to cut along one side of the backbone from the tail to the neck. Repeat on the other side. Remove the backbone completely. Save it for stock — it makes extraordinary turkey broth.
- 3Score the breastbone cartilage and flattenFlip the bird breast-side up. Find the keel bone (the central cartilage running down the breast). Score through it with a knife or press firmly with both hands at the center of the breast until you feel and hear the cartilage crack. The bird should now lie completely flat.
- 4Tuck the wing tips and apply seasoningFold the wing tips back behind the breast (hotel-style) to prevent them from burning. Apply your compound butter and rub as normal — the flattened bird presents a larger, more even surface for seasoning and smoke contact.
- 5Cook at 325°F–350°F until doneA spatchcocked 12-pound turkey at 325°F–350°F typically finishes in 2.5–3.5 hours. Monitor temperature constantly. The breast and thigh should reach target temperatures within 15 minutes of each other — if they diverge more than that, the bird may not be fully flat.
- ✓ 30–40% faster cook time
- ✓ Breast and thigh finish within 15 min of each other
- ✓ Maximum surface area for rub and smoke
- ✓ More uniformly crispy skin all over
- ✓ Backbone makes excellent stock
- ✗ Less dramatic whole-bird presentation
- ✗ Requires poultry shears or sharp knife
- ✗ Takes up more horizontal grill space
- ✗ Some people find the technique intimidating initially
- ✗ Cannot stuff the cavity (not recommended anyway)
Troubleshooting Common Barbecue Turkey Problems
Even experienced pitmasters encounter issues. Here’s what to do when things don’t go exactly to plan.
Reduce heat immediately by closing bottom vents (charcoal) or lowering burner (gas/pellet). If charcoal, open the lid briefly to let some heat escape. Consider tenting the bird with foil to slow exterior heat absorption while the interior catches up.
Add more charcoal or raise the burner temperature. If it’s very late in the cook and you’re running out of time, raise to 375°F for the final stretch — you’ll sacrifice some smoke flavor but ensure food safety. Never serve turkey below 165°F breast temperature.
Wet skin is the culprit 90% of the time. Raise the temperature to 375°F–400°F for the final 30 minutes with no foil. Alternatively, finish the bird in a preheated 400°F oven for 15–20 minutes — it works better for crisping than most outdoor setups.
Stop adding wood after the first 2.5–3 hours. If smoke is already too intense, the flavor won’t diminish much during the rest of the cook — but avoid making it worse. Next time, use milder wood (apple) and fewer chunks.
Cover the breast with foil immediately to protect it from further heat while the thighs finish. Alternatively, remove the breast from the cavity (carve the bird partially), wrap it in foil, and continue cooking the leg quarters until done.
Move the turkey off the direct flame immediately. Check and refill the drip pan — it has likely run dry. Let the flare-up subside completely before returning the bird to the indirect zone. Never use water to douse a fat fire in a gas grill.
The breast must reach a minimum of 165°F and the thighs a minimum of 175°F as measured by a calibrated thermometer. Do not rely on pop-up timers — they’re notoriously inaccurate and typically trigger well after the breast is already overcooked. If you don’t have a probe thermometer, get one before you start. It is the single most important piece of equipment for this cook.
Serving, Carving, and What to Serve Alongside
After 6–8 hours of careful tending, the final 30 minutes of rest and the carving process deserve as much attention as everything that came before. How you handle the bird in this stage determines whether the moisture you’ve worked to preserve actually ends up in the meat — or on the cutting board.
The Rest: Non-Negotiable
Rest the turkey for a minimum of 30 minutes after pulling it off the grill, 45–60 minutes for a bird over 14 pounds. During the rest, the internal temperature continues to rise 5–10°F (carryover cooking), and the muscle fibers, which contracted hard during cooking, relax and reabsorb the juices that were driven to the center by heat. Cut into the bird too early and those juices run straight onto the cutting board. Wait long enough and they stay in the meat where they belong.
Tent loosely with foil — do not wrap tightly, which traps steam and softens the skin you worked hard to crisp.
Drip Pan Gravy
The liquid in the drip pan underneath your turkey is liquid gold. It contains rendered fat, turkey juices, smoke-infused stock, and all the aromatics from the cavity. Strain it into a saucepan, skim the fat (or don’t — it adds flavor), and reduce by half over medium heat. Whisk in a tablespoon of flour or cornstarch mixed with cold water to thicken if desired. This is the best gravy you will ever make, and it cost you nothing extra.
Sides That Complement Smoked Turkey
Barbecued turkey is more aggressively flavored than oven-roasted turkey, so the sides that accompany it need to either complement the smokiness or provide contrast to it. Classic pairings that work brilliantly: smoked mac and cheese (lean into the smoke theme), sweet potato with brown butter and pecans (sweetness against the savory smoke), cranberry sauce (always — the acidity cuts through the richness), collard greens with apple cider vinegar, and cornbread with honey butter.
If you want to explore beyond the standard rub options and find a great finishing sauce that pairs with smoked poultry, our guide to the best barbecue sauces has options ranging from vinegar-forward Eastern Carolina styles to sweet and sticky KC-style glazes that are extraordinary on turkey.

Formulated specifically for chicken and turkey barbecue. Sweet, smoky, savory balance. No fillers, no MSG. Perfect on both spatchcock and whole-bird preparations.
Frequently Asked Questions
For low-and-slow smoking, maintain your grill or smoker at 225°F–250°F. For a faster cook that still delivers good smoke flavor, run at 325°F–350°F. The hybrid approach — starting at 225°F for 2 hours, then raising to 325°F — delivers the best of both. The internal temperature of the breast must reach 165°F and the thigh 175°F before the bird is safe to eat. Always cook to internal temperature, not to time.
At 225°F–250°F, allow approximately 30–40 minutes per pound. A 12-pound turkey takes roughly 6–8 hours at this temperature. At 325°F–350°F, the same bird is done in approximately 3–4 hours. A spatchcocked bird at 325°F finishes in 2.5–3.5 hours. Always verify with a meat thermometer — these are estimates that can vary significantly based on your specific grill, outdoor temperature, and wind conditions.
Yes, strongly recommended. Brining is one of the highest-impact steps you can take for a juicy result. A wet brine (salt, sugar, water, aromatics) works for 12–24 hours. A dry brine (salt rub applied and rested uncovered in the refrigerator for 24–48 hours) is simpler, produces excellent crispy skin, and concentrated flavor. Either method dramatically improves moisture retention during the long barbecue cook. The only turkey you should not brine is one labeled “enhanced,” “self-basting,” or “contains solution” — these are pre-seasoned.
Apple wood is the consensus top choice — mild, sweet, and very forgiving. Cherry wood is an excellent alternative that adds beautiful color. Pecan works well used sparingly. Avoid mesquite (too aggressive and bitter on poultry) and heavy hickory (similarly overwhelming). For the whole cook, use 2–3 chunks of apple or cherry on a charcoal setup, or add wood every 45–60 minutes for the first 3 hours of a long smoke.
It’s not required, but it’s highly recommended for most cooks. Spatchcocking (removing the backbone and flattening the bird) reduces cook time by 30–40%, allows the breast and thighs to reach target temperatures within minutes of each other rather than 45+ minutes apart, and maximizes surface area for rub and smoke penetration. The only real downside is less dramatic presentation at the table — but the improved cooking performance is worth it every time.
It is not recommended. Stuffing insulates the cavity and dramatically slows the cooking of the inner meat, keeping it in the food-safety danger zone (40°F–140°F) for dangerously long periods. It also prevents even smoke and heat circulation through the bird. Cook stuffing separately and fill the cavity only with aromatics that you’ll discard — citrus, garlic, onion, and fresh herbs add subtle flavor without the safety risk.
Brining is the most effective prevention by a wide margin. Beyond that: apply compound butter directly on the breast meat under the skin, use the Texas Crutch (foiling the breast at 155°F), cook breast-side down for the first third of the cook if using a whole-bird approach, and rest the bird for at minimum 30 minutes before carving. The rest is arguably as important as the cook itself — cutting too early wastes all the moisture you worked to preserve.
10–14 pounds is the sweet spot for barbecue turkey. Birds in this range cook more evenly, absorb smoke flavor more thoroughly, and fit on most standard grills without overcrowding. Birds over 16 pounds take an extremely long time to reach safe internal temperatures and dramatically increase the risk of the breast overcooking before the thighs are done. For large gatherings, two 12-pound birds cook simultaneously and produce better results than one 22-pound bird.
Yes. A water pan beneath the turkey adds humidity to the cooking environment, which prevents the surface from drying and creating a moisture barrier before the interior has cooked. It also moderates temperature spikes. Fill it with hot water before the bird goes on, and optionally add apple cider, orange slices, or fresh thyme for subtle aromatic influence. Refill with hot water (not cold, which drops grill temperature) if it runs low during a long cook.
Crispy skin requires completely dry skin going into the cook. After brining, pat thoroughly dry and allow to air-dry uncovered in the refrigerator for at least 4 hours (overnight is better). Apply a thin even layer of oil or softened butter on the skin surface — avoid excess fat, which steams instead of crisps. Finish the bird at 375°F–400°F for the last 20–30 minutes. If the skin still isn’t crisping on the grill, a 15-minute blast in a 425°F oven does the job reliably.
The Bottom Line: Your Oven’s About to Lose Its Job
Barbecuing a turkey is not a difficult cook. It demands attention, preparation, and the right equipment — but nothing about it is technically beyond the reach of any backyard cook who takes it seriously. The results are categorically different from oven roasting: the smoke-infused meat, the crackle of genuinely crispy skin, the complexity that only live fire and hardwood can produce.
The principles that make the biggest difference:
- Brine without exception. Wet or dry, brining is the difference between a juicy result and a dry one, and it takes minimal effort for maximum return.
- Dry the skin completely. Wet skin won’t crisp. Period. The overnight air-dry in the refrigerator is non-negotiable for people who care about texture.
- Choose mild wood. Apple or cherry. Use it for the first 3 hours only. Resist the urge to keep adding smoke — it makes the result bitter.
- Cook by temperature, not time. A wireless dual-probe thermometer is the single most valuable investment for this cook.
- Rest generously. 30–45 minutes minimum. Every minute of rest pays dividends in moisture when you carve.
For more on choosing the right equipment for this kind of cook, our best barbecue grills guide covers options from entry-level kettles to high-end pellet setups — with recommendations matched to the type of cooking you want to do most. Whatever setup you’re working with, the principles above apply. Good luck, and good smoke.